How to create a project and add issues
In this section, you will learn how to manage your projects:
Creating a project
You can create a completely new project or base it on an issue.
New project
To create a project:
-
Go to any page a project can be created from:
-
In the left panel, select Projects, then click Create → Project.
-
In the list of portfolios and projects, on the List tab, click Create project under the list.
-
-
Enter a name for the project. It's better to keep it short and clear, which makes the project easier to work with.
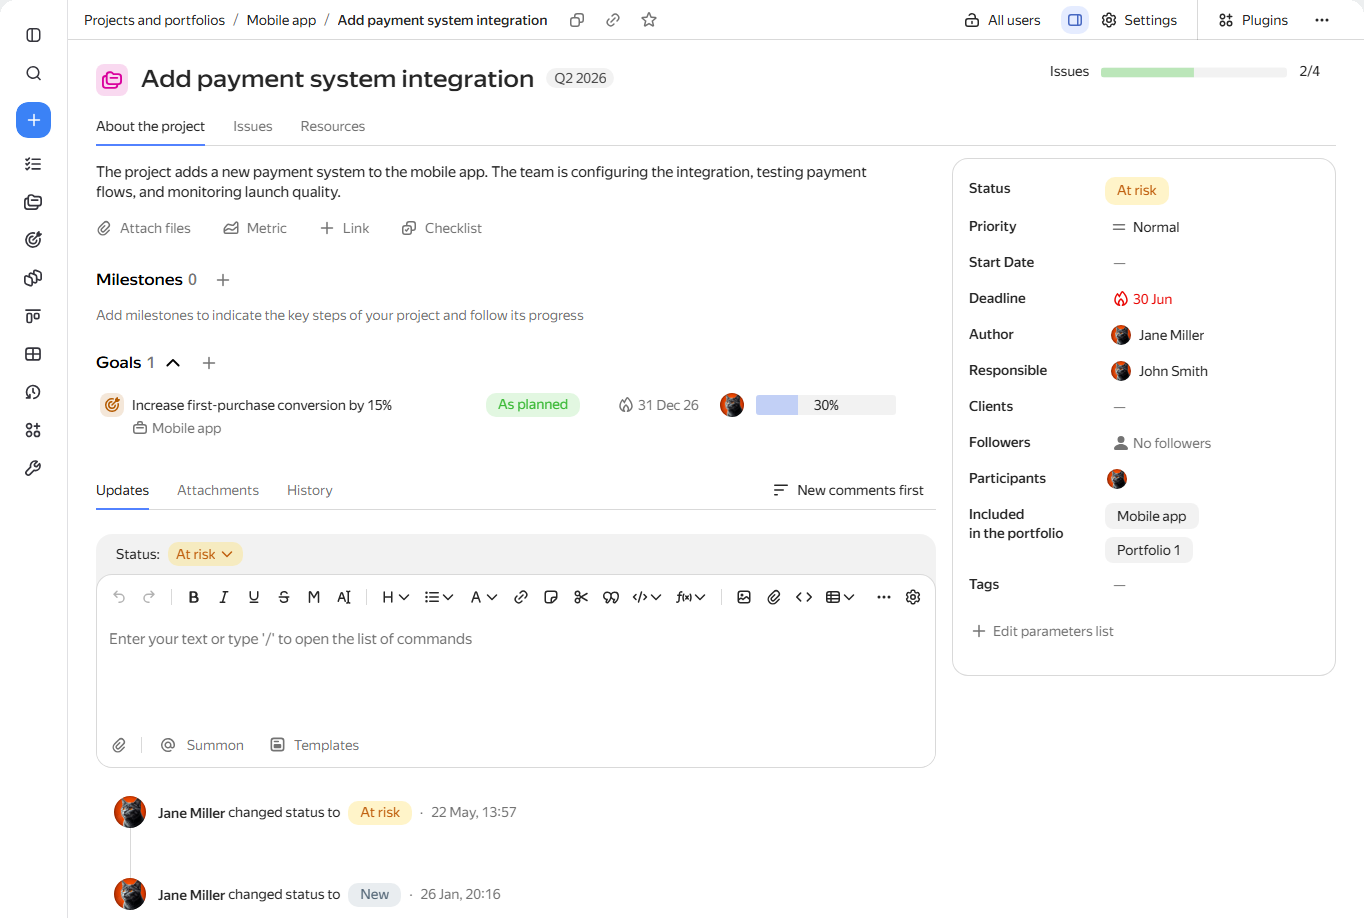
-
On the About the project tab, add information:
-
Project description: What you are working on and what goals you want to achieve.
-
File: Add the project files.
-
Metric: If you have a DataLens chart that tracks key project metrics, embed it on the project page. For more information about adding a metric, see this guide.
-
Link: Add links to other projects, portfolios, or goals.
-
Checklist: Specify the project's key milestones or goals. You can work with a project checklist just like an issue checklist. For details, see Creating a checklist.
-
In the right panel, specify the project parameters.
Description of project parameters
- Status: Specify the current stage of the project.
- Start date and Deadline.
- Lead, Customers, Followers, and Participants: Start typing the name or login of the employee and select a relevant option from the list.
- Included in the portfolio: Specify the portfolio the project belongs to.
- Tags: Add or select the tags that would make it easier to find the project you need.
-
-
Add issues to the project. You can add issues from the project page or the issue page, or by using bulk editing.
The project is not linked to any issue queue: that is why you can add issues to it from any queue that you have access to. Access to project issues depends on the access settings of the queue that the issue belongs to.
You can add no more than 2,000 issues to a project.
By default, a new project is available to all organization employees. How to restrict access to a project
Copying a project
To create a new project based on an existing one, use the copy option.
-
Open the project you want to copy.
-
In the top right corner, select Actions → Copy project.
-
Configure the project copy options:
- Specify who will have access to the copied project: All employees or Members only.
- To copy the project's files and attachments, enable the Copy files and attachments option.
- To copy the values of the project's main fields, enable the Copy main field values option.
-
If you selected the Copy main field values option, fill in the Summary, Description, Deadline, Responsible, Participants fields. By default, the field values will be copied from the source project.
-
Click Create copy.
Converting an issue to a project
The converted issue will be added to a project and the new project will show its parameters:
- Name, description, checklist.
- Start date and end date.
- Author, assignee, and followers.
Issue comments are converted to project comments and displayed in the About the project tab.
To create a project based on an issue:
-
Open the issue page. The issue should not belong to another project. To delete an issue from the project, clear the Project field on the right panel.
-
In the top right corner, select Actions → Convert to project and click Convert.
Adding issues to a project
An issue may belong to multiple projects. You can have only one main project, and the others are considered additional. In additional projects, you can work with the issue just like in the main project: it will appear in the issue list and on the Gantt chart.
When you filter issues by the Project parameter on other Yandex Tracker pages (for example, in widget settings, on a queue page, or in an issue filter), issues will be filtered only by their main project. To filter issues by all projects they belong to, enable the Show issues for which this project is secondary option when configuring the project filters. For more information about issue filters, see Creating and configuring an issue filter.
You can add your issue to up to 40 projects, including the main one.
From the project page
-
Go to the Issues tab and click Add issue.
-
Select the issue you want to link:
New issueExisting issue- Click New.
- Enter the issue name, select the queue, and press Enter. The project will become the issue's main project.
If you can create an issue in the queue only using a form, you'll see the Select form button on the screen.
- Click Existing.
- Start typing the issue key or name and select the option you need from the list.
If an issue already has a main project, the current project will become an additional project. If the issue is not added to other projects, this project will become its main.
From the issue page
-
Open the issue page.
-
Click the Project field on the right panel. If you don't see the Project field, add it by clicking Add parameters.
-
In the Main or Additional field, start typing the project name and pick the option you need from the list. Click Save.
Adding multiple issues
-
Select the issues you need using filters.
-
Select the issues that you want to add to the project.
-
In the bottom panel, click , then select Add to project.
-
Start typing a project name and select the option you need from the list.
-
Wait for the issues to be processed.
If an issue already has a main project, the current project will become an additional project. If the issue is not added to other projects, this project will become its main.
Moving issues to another project
You can change the main project for all or some project issues. Child issues will also be added to the new main project.
-
Open the project page.
-
Go to the Issues tab.
-
Add next to the issues for which you want to change the main project.
To select all the project issues at once, check the box above the issue list.
-
Click under the issue list and select Change primary project.
-
Start typing a project name and select the option you need from the list.
-
Wait for the issues to be processed.
Deleting a project
A project can be deleted by its author or the user specified in the Responsible field.
To delete a project:
-
In the left panel, select Projects or follow the link https://tracker.yandex.com/pages/projects/list and open the project page.
-
In the top right corner of the page, click and select Delete project.
An issue key is a unique identifier contained in the issue link. It consists of the queue key and a number, for example TEST-123.